I lied. I seem to always be lying these days. on the couch. {tee hee}
but I'm not going to be participating in Christmas in July.
It would seem that this baby is trying to suck the very will to live right out of me. Last week I actually had to have an i.v. of fluids stuck in me to battle dehydration. it was so cold!
Anyhow, my shop is temporarily closed. *pause for moment of silence*
but, I definitely recommend you still hop over to Larissa's blog:
http://www.zitzmanfam.blogspot.com/
and snag yourself one of the awesome giveaways this month. Also, I hear there will be many fun project ideas too. Merry Christmas to all!

Monday, July 5, 2010
Monday, June 21, 2010
greetings from beyond the grave
or maybe it just feels like I'm dead. I had so much planned for the spring and summer. So many fun projects for you to whip up at home. but alas. my life got to me. What with graduation season, vacation season, and dun dun dun dun... wedding season! and when you come from a family as large as mine, you participate in any and all seasonal activities.
And then a couple weeks ago, I woke up one morning to find two little pink lines on a white plastic stick staring me in the face. That's right my friends, I'm pregnant. And you'd be right in thinking that this blog will be pretty empty for a little while longer.
BUT- I am participating in a 'christmas in july' give-away in {you guessed it} july.
 I'll try to have more details for you soon. But right now I have to go throw up everything I've ever eaten in my entire life. and feed my kids a nutritious meal of donuts and cereal.
And then a couple weeks ago, I woke up one morning to find two little pink lines on a white plastic stick staring me in the face. That's right my friends, I'm pregnant. And you'd be right in thinking that this blog will be pretty empty for a little while longer.
BUT- I am participating in a 'christmas in july' give-away in {you guessed it} july.
Tuesday, March 16, 2010
I've been having fun with my lace....
 shhh. don't tell anyone that this is really a boy. a very pretty boy.
headbands now for sale in the shop.
Tuesday, February 16, 2010
More fun than baskin robins
So there I was, perusing one of my fave haunts, lace heaven, when I came across this lace...
 in 41 flavors! {I know the page says '47' but there are really only 41.} I am utterly giddy. I bought two yards of each. the best part was saying, "pale lavender? add to cart. lavender kiss? add to cart. light blue? add to cart...." just so I didn't miss one. Get comfy, maybe use the bathroom first, because it's gonna take you a while to put 41 different laces in your cart. but it will be well worth it, I'm sure. I don't know what I'm going to make - but it WILL be awesome!
Check out all the colors here. and if you buy tonight, you can take 15% off with the code MARDI GRAS. but it's only for orders over $25. and good luck spending that much! the more you buy, the cheaper everything gets. my lace? 12 cents a yard!!
Tuesday, February 9, 2010
Heart Felt Valentine Banner

There is still plenty of time to make your house into the tunnel of love this valentines day. This banner whips up super easy - you could even make 2 or 3!
{Did somebody say v-day party?!!}
Here's what you'll need for one banner:
-1/8 yard {72" wide} deep red felt
{I think you know you can make it any color you want.
I do NOT recommend felt sold by the square here, it's too thin.}
-Scrap of 1/4" ribbon
-Basic sewing supplies + sewing machine
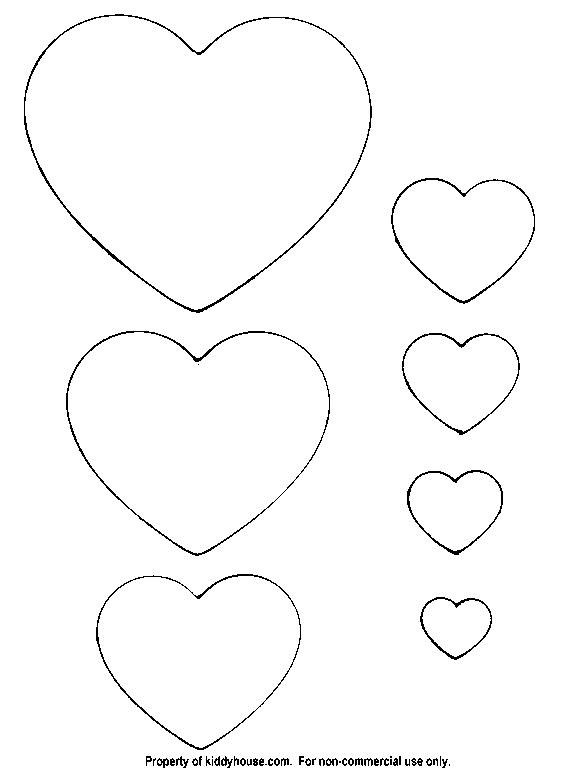
-Heart template. I used this one.
-1/8 yard {72" wide} deep red felt
{I think you know you can make it any color you want.
I do NOT recommend felt sold by the square here, it's too thin.}
-Scrap of 1/4" ribbon
-Basic sewing supplies + sewing machine
-Heart template. I used this one.
 Trace and cut out as many hearts as you can from your felt.
I used the three largest sizes from the template.
 Stack your hearts, varying the sizes at random. Make sure your banner will start and end with the largest heart. Stitch across the width of each heart (don't forget to back stitch your first and last heart). To make a chain, sew 3-4 stitches between hearts. Be sure you are gently pulling the last sewn heart forward as you stitch on nothing. This will prevent the stitches from building on top of each other and making a gnarly mess.
 To connect the hearts, turn your hand wheel towards you to put your needle in the down position. Raise your presser foot and butt the next heart right up to your needle. Lower your presser foot and continue sewing.
Cut your ribbon scrap into two 4" pieces. Fold each one in half and pin to the beginning and end heart of your banner to form the hangers.
You banner may be all jumbled by now. Just be sure that you pin your ribbon to the front of one heart and the back of the other. {So that the hearts are mirror images. make sense?} Stitch across the ribbon
And your done! This banner is festive for any room, including the office, school, etc., but it also makes a dang cute photo prop.

I think the grandparents are going to love this year's valentine card!
{P.S. the word 'LOVE' in the first picture is spelled out with unfinished wood letters that I bought at my local craft store. They were 80 cents a piece. I painted them with metallic silver paint and adhered them to the wall with wall putty. so pretty.}
Wednesday, February 3, 2010
Heart Felt Valentines

Well after a little hiatus with a sickly computer... I'm back.
And I'm hoping you have room in your heart {and schedule}
for my pretty valentine project.
Don't be fooled by their super cute exterior, these are simple to make!
You will need:
assorted colors of felt scraps
assorted buttons
basic sewing supplies
lolly pops and candy sticks
and this template

did I say slash marks are for "view one"? I meant view 2.
Enlarge or reduce this image as needed so the heart template measures
approx. 4" wide and 4.25" long. Cut out templates.
Heart on a Stick Valentine

Fold your felt in half so you have two layers.
With a water or air soluble fabric pen, trace one heart per valentine.
 If you're lolly pop is small, go ahead and cut out your hearts, two at a time.
Mine is a little on the larger size. {yes, we are still talking about the lolly pop. not my rear.} Instead of cutting out the heart on the line and stitching on the interior edge,
I'm going to use the pen line as my stitching line, which will make my heart a little roomier.
 Cut around the heart loosely leaving a wide border, if necessary.
Using your pen, trace on your message. I did "xoxo" but "love" would be cute!

Using a zigzag or satin stitch, stitch over your "X"s and stitch buttons over your "O"s.
I used a tear-away stabilizer for the back to keep the felt from puckering.
If you don't have any, you can use wrapping tissue. Stitch through only one heart.
 Pin the top layer of felt onto the bottom with the right sides facing out.
Stitch around the heart using a narrow seam allowance.
Be sure to leave a gap in the stitching at the heart's bottom point.
 Trim around the heart.
 Using that trusty old fabric pen and a ruler, mark a line on across the back of the heart.
 Pinch the front and back heart and pull to separate.
 Make a small snip and carefully slide your scissors into the opening.
 Cut along the pen line up to but not through the stitching line.
Cut through only the back layer.
 Slip the lolly pop into the slit with the stick going through the opening in the stitching.
Pull the top flap over the lolly pop to conceal it and you're done!
Cupid Struck Valentine
 Trace and cut out two hearts per valentine.
Pen the slash marks onto the top heart.
 Pin the two hearts together and stitch using a narrow seam allowance.
 Using your presser foot as a guide, stitch around the inside edge of the
first stitching line. {This gives it just a little more visual interest.
You don't have to do it if you don't want to.} Using the same method
as the lolly pop valentine, cut through the slash marks.
 Trace the arrow head and tail onto felt but don't cut out.
Note the DO NOT SEW lines marked on the template with double slashes.
 Cut around the design but do not cut on the lines.
Pin to a second layer. Stitch on the drawn lines.
 For those not familiar with how to 'pivot and turn' it's really easy.
Stitch to the end of your marked line and stop.
Turn your hand wheel {on the side of the machine}
towards you until your needle is in the down position.

Raise your presser foot and rotate your fabric with the needle still down.
Rotate until the center mark on your presser foot {most feet have one}
is lined up with the connected next line to stitch.
Lower your presser foot and stitch on.
 Trim around the stitching. Your pieces should look like this.
Feed a candy stick through the slashes in your heart front. Slip the tail feathers onto the bottom of the stick and the arrow head to the top. You can keep the head from falling off by placing a small glue dot onto the candy and then pressing the felt into it.
See? Easy Peasy. And too stinking cute. The pen marks should dissolve on their
own in day or so. So let me know if anyone needs my address.
so you can send me one. I just love candy!
Friday, January 1, 2010
the next holiday on the list...

Ok. I don't mean to annoy everyone, but I'm a "so now what?" type of girl. It's what keeps me going, it's what keeps me excited about something, anything! And yes. Valentines is next. {unless you celebrate President's Day. and frankly if you do, you're weird.}
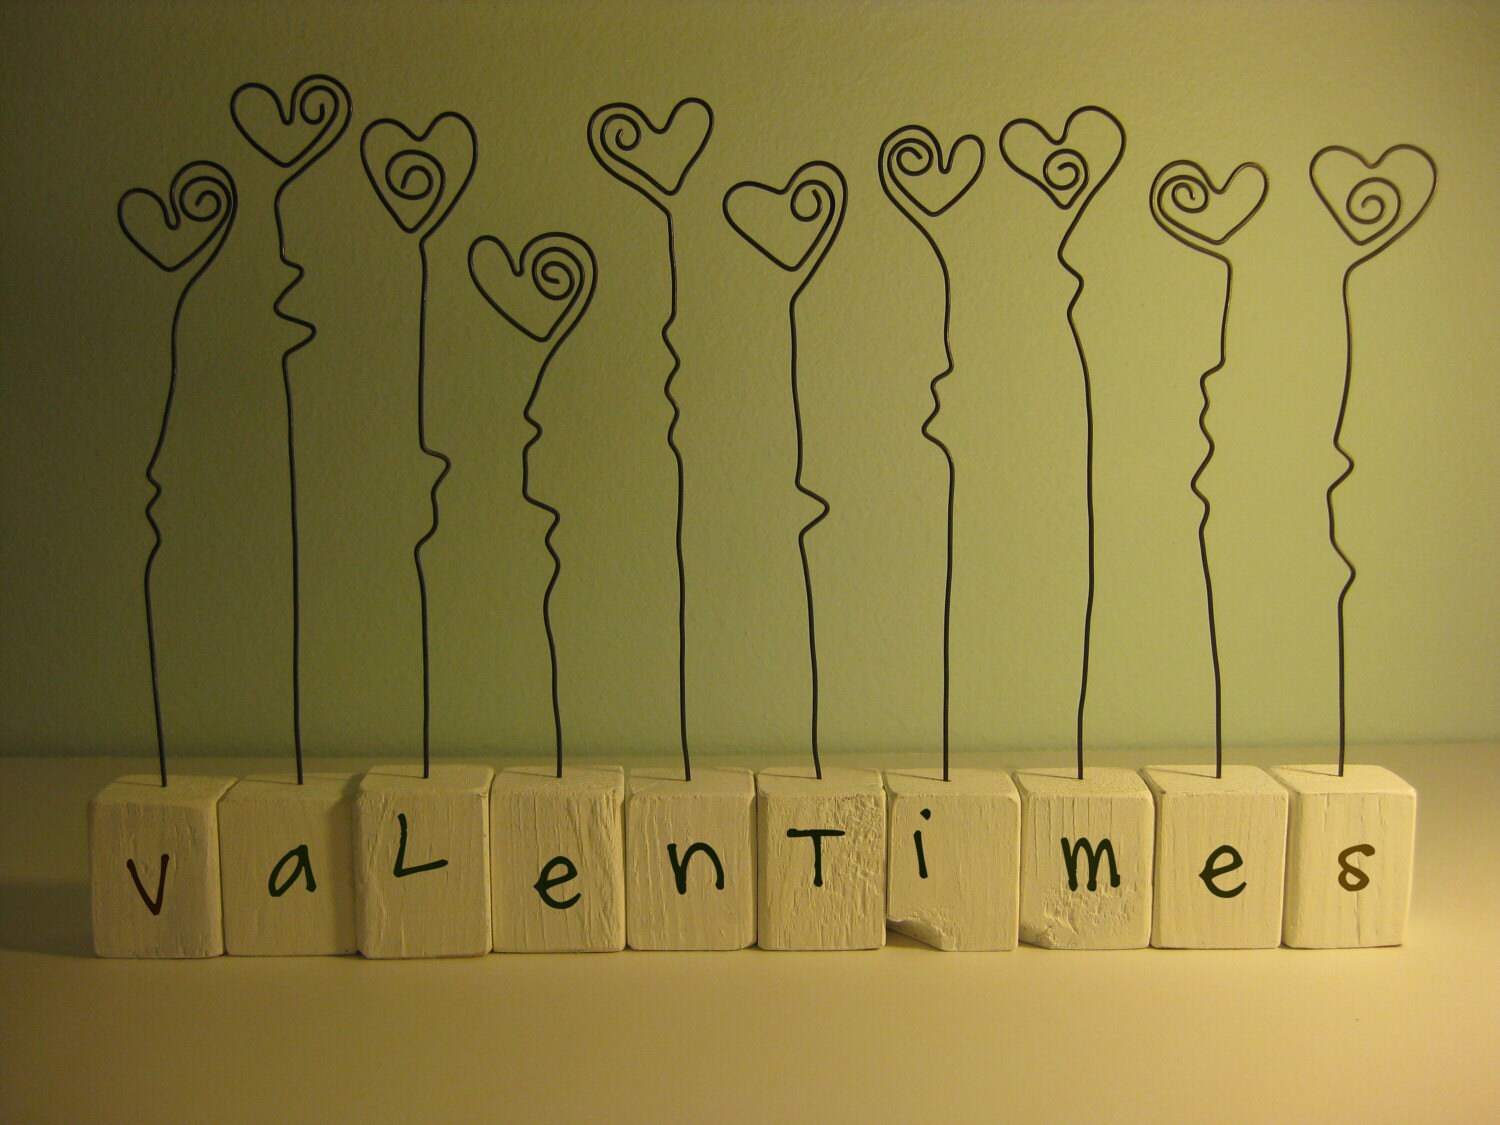
and these? are adorable. My talented brother - in - law Sam, has just put a few goodies in his brand new etsy shop. Check it out here. These little heart stands will make a delightful teacher gift (or anybody gift) for the lovely holiday.